How to create dynamic forms with Forms Designer in SharePoint 2010
In the first post I would like to show a simple case of customization SharePoint 2010 forms with Forms Designer tool. I will create form with tabs and tables and add basic dynamic with JavaScript.
Last week I worked on Help Desk system. I started with template ‘Help Desk’ from CodePlex project and implement some modifications. Next I needed to design forms for requests to make it simpler and more usable. The default form has the following view:
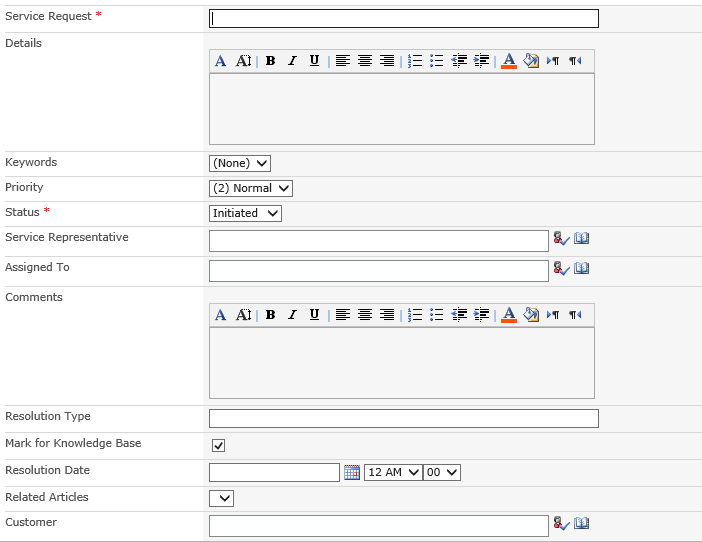
There are many fields, some of which user doesn’t have to define himself, for ex.: Resolution Type, Resolution Date etc, cause they have to be filled by the person assigned to the request. And some should be predefined automatically in most cases, for ex.: if author and customer are the same person Customer field has to be filled with current user value. Also, it would be great to organize fields in categories: Main (required info), Resolution and Links.
So, I decided to distribute fields into tabs with Forms Designer tool, add autofilling to Customer field with current user and hide resolution fields if status of the request is not ‘Resolved’ or ‘Closed’. For the last two tasks I used Forms Designer JavaScript framework that allows to manipulate fields in JQuery manner.
After 5 minutes of manipulation with Forms Designer’s drag-n-drop interface I got the following form:
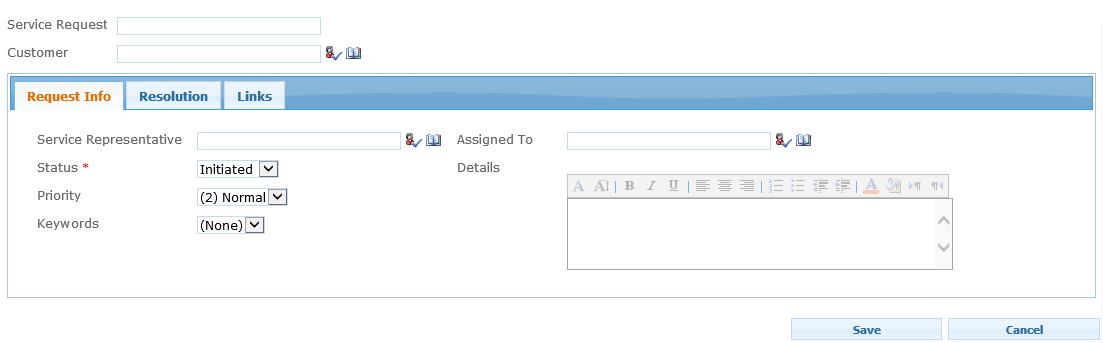

Looks nice. Now we can further simplify this form:
- Resolution tab is useful only if status of the request is ‘Resolved’ or ‘Closed’. So, I will hide it for other cases.
- In most cases customer and author are the same person. So, I will prefill this field with current user info.
Resolution tab
In the Forms Designer I opened JS-editor window and put the following code to disable ‘Resolution’ tab when Status field equals ‘Close’ or ‘Resolved’:
// Enable or disable 'Resolution' tab
function setResolutionTab() {
  var v = fd.field('Status').control().value();
  if (v == 'Closed' || v == 'Resolved') {
    $('#fd_tabcontrol-0').tabs('option', 'disabled', null); // Enable
  } else {
    $('#fd_tabcontrol-0').tabs('option', 'disabled', [1]); // Disable
  }
}

// Subscribe on status change
fd.field('Status').control().change(function () {
  setResolutionTab();
});

// Initialize
setResolutionTab();
To hide disabled tabs I added following CSS directly to the Forms Designer:
.ui-tabs .ui-state-disabled {
  display: none; /* disabled tabs don't show up */
}
Great. Now when user sets status to ‘Initiated’ or ‘In progress’ they see only two tabs:

Autofilling
I added this function only on a new form. The following code loads the current user login and pass it into the Customer field:
// Load current user login
SP.SOD.executeOrDelayUntilScriptLoaded((function () {
  var ctx = new SP.ClientContext.get_current();
  var web = ctx.get_web();
  ctx.load(web);
  var user = web.get_currentUser();
  user.retrieve();
  ctx.executeQueryAsync(
  function () {
    // Set user login
    fd.field('Customer').control().value(user.get_loginName());
    // Run validation by emulating validation image click
    fd.field('Customer').control()._el().find('a:eq(0)').click();
  });
}), "SP.js");
Method _el() of the FDControl class returns control’s div-wrapper as JQuery-object. So, if you work with custom fields and the Forms Designer doesn’t know where the field stores its value, you may use this method. And here it was also helpful to click on the validation link in the people picker field.
I can answer your questions in the comments. Thank you.